TECHNOLOGY
How to Build a Gaming PC Step by Step
Learn how to build a gaming PC step by step! This detailed guide covers component selection, installation, BIOS setup, and OS installation.
Building your own gaming PC can be an incredibly rewarding experience. You get to choose every component, ensuring optimal performance for your favorite games, and you gain a deeper understanding of how your computer works. Over the years, I’ve built several gaming rigs for myself and friends, and I can tell you, the satisfaction of playing a game on a PC you built yourself is unmatched. This comprehensive guide will walk you through each step of the process, from planning to powering on.
Before You Begin: Planning and Preparation
Think of this as laying the foundation for a powerful machine. Careful planning will save you time, money, and frustration later.
Step 1: Define Your Budget and Needs
The first crucial step is to determine how much you’re willing to spend and what kind of gaming experience you’re aiming for.
- Set a Budget: Decide on a maximum amount you’re comfortable spending. This will heavily influence your component choices. Gaming PCs can range from budget-friendly builds around $800 to high-end systems costing upwards of $2000 or more.
- Determine Your Gaming Goals: What types of games do you want to play? What resolution and refresh rate are you targeting (e.g., 1080p at 60fps, 1440p at 144fps, 4K at 60fps)? Knowing this will help you choose the right graphics card and CPU.
- Consider Future Upgradability: Think about whether you want a system that can be easily upgraded in the future. This might influence your choice of motherboard and power supply.
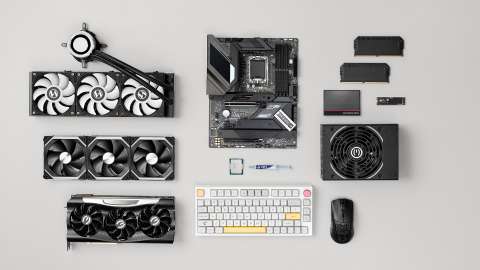
Step 2: Choose Your Components
This is where the fun begins! Selecting the right parts is essential for a balanced and powerful gaming PC.
- Central Processing Unit (CPU): The brain of your PC. For gaming, look for a CPU with a good balance of core count and clock speed. Popular manufacturers include Intel and AMD. Research benchmarks for specific games you want to play to help you decide.
- CPU Cooler: Your CPU generates heat, so a good cooler is essential to prevent overheating and ensure optimal performance. You can choose between air coolers and liquid coolers. For most mid-range builds, a good air cooler is sufficient.
- Motherboard: The backbone of your system. It connects all your components. Choose a motherboard that is compatible with your CPU socket, has the features you need (e.g., number of RAM slots, PCIe slots), and fits your chosen case.
- Random Access Memory (RAM): Essential for running applications and games smoothly. For gaming in 2023 (and beyond), 16GB is generally considered the sweet spot. 32GB might be beneficial for more demanding tasks or future-proofing. Pay attention to the speed (MHz) of the RAM, as faster RAM can sometimes improve performance.
- Graphics Card (GPU): The most important component for gaming. Your GPU will handle rendering the visuals in your games. Choose a graphics card based on your target resolution and refresh rate. NVIDIA GeForce and AMD Radeon are the main manufacturers. Research benchmarks for specific games at your desired settings.
- Storage: You’ll need storage for your operating system, games, and other files. A Solid State Drive (SSD) is highly recommended for fast boot times and loading speeds. A 1TB SSD is a good starting point. You can also add a larger capacity Hard Disk Drive (HDD) for mass storage of less frequently accessed files.
- Power Supply Unit (PSU): Provides power to all your components. Choose a PSU with enough wattage to handle all your components, with some headroom for future upgrades. Use an online PSU calculator to estimate your power requirements. Look for reputable brands with good efficiency ratings (e.g., 80+ Gold).
- PC Case: The enclosure for your components. Choose a case that can accommodate all your parts, has good airflow for cooling, and fits your aesthetic preferences. Consider the size of your motherboard when selecting a case (e.g., ATX, microATX, mini-ITX).
- Operating System (OS): You’ll need to purchase a license for an operating system, typically Windows 10 or Windows 11.
- Peripherals: Don’t forget essential peripherals like a monitor, keyboard, and mouse. These are crucial for actually playing games!
I’ve personally spent hours researching components to find the best balance of performance and price for my builds. Don’t rush this step – read reviews and compare specifications.
Step 3: Gather Your Tools
Before you start building, make sure you have the necessary tools:
- Phillips head screwdriver (magnetic tip is helpful): For screwing in most PC components.
- Anti-static wrist strap: Essential to prevent electrostatic discharge (ESD) which can damage sensitive components. I always wear one – it’s a small investment for peace of mind.
- Cable ties or Velcro straps: For cable management to keep your build tidy and improve airflow.
- Zip ties (optional): Another option for cable management.
- Small container or magnetic mat: To keep screws organized.
- Headlamp or flashlight: Can be helpful for seeing inside the case.
- Monitor, keyboard, and mouse: To test your PC once it’s built.
- USB drive with the Windows installation files: You should have created this beforehand.
Step 4: Prepare Your Workspace
Choose a clean, well-lit, and static-free workspace. A large table with plenty of room to lay out your components is ideal. Make sure you have good ventilation.
Step 5: Install the CPU on the Motherboard
This is one of the most delicate steps, so handle the components with care.
- Open the CPU socket lever on the motherboard.
- Align the arrow or triangle on the CPU with the corresponding mark on the socket.
- Gently place the CPU into the socket. It should sit flush without any force. Do not force it!
- Close the CPU socket lever.
- Install the CPU cooler according to its instructions. This usually involves applying thermal paste (if it’s not pre-applied) and securing the cooler with screws or clips.
Step 6: Install RAM on the Motherboard
- Locate the RAM slots on your motherboard. Refer to your motherboard manual to determine the correct slots to use for your desired configuration (e.g., dual-channel).
- Open the clips at the ends of the RAM slots.
- Align the notch on the RAM stick with the notch in the slot.
- Press down firmly on both ends of the RAM stick until it clicks into place and the clips close.
Step 7: Mount the Motherboard in the Case
- Install the standoffs in your PC case. These are small screws or pegs that elevate the motherboard and prevent short circuits. Your case might come with standoffs pre-installed.
- Carefully place the motherboard into the case, aligning the screw holes with the standoffs.
- Secure the motherboard to the standoffs with screws. Don’t overtighten.
Step 8: Install the Graphics Card
- Locate the primary PCIe x16 slot on your motherboard (it’s usually the longest slot and often a different color).
- Remove the corresponding slot covers from the back of your PC case.
- Open the retaining clip at the end of the PCIe slot.
- Align the gold connector pins on the graphics card with the slot.
- Press down firmly until the graphics card clicks into place and the retaining clip closes.
- Secure the graphics card to the case with screws.
Step 9: Install Storage Devices (SSDs and HDDs)
- Locate the drive bays in your PC case.
- Mount your SSD and/or HDD in the drive bays using screws.
- Connect SATA data cables from the storage devices to the SATA ports on your motherboard. Refer to your motherboard manual for the location of these ports.
- Connect SATA power cables from the power supply to the storage devices.
Step 10: Install the Power Supply Unit
- Place the PSU in its designated bay in the PC case.
- Secure the PSU to the case with screws.
Step 11: Connect Power Supply Cables
This step involves connecting the appropriate power cables from the PSU to the motherboard, graphics card, and storage devices. Refer to your component manuals for specific instructions.
- 24-pin ATX connector: Main power connector for the motherboard.
- 8-pin (or 4+4 pin) EPS connector: Powers the CPU.
- PCIe power connectors (6-pin or 8-pin): Power high-end graphics cards.
- SATA power connectors: Power SSDs and HDDs.
Ensure all power connectors are firmly plugged in. A loose connection can cause problems.
Step 12: Connect Case Fans and Front Panel Connectors
- Mount any case fans you are using.
- Connect the fan cables to the fan headers on your motherboard.
- Connect the front panel connectors from your case (power button, reset button, USB ports, audio jacks, etc.) to the corresponding pins on your motherboard. Refer to your motherboard manual for the location and orientation of these pins – this is a common area for mistakes.
Step 13: Cable Management
Take your time to organize the cables inside your PC case. Use cable ties or Velcro straps to bundle and route cables neatly. Good cable management improves airflow and makes it easier to work inside your case in the future.
Step 14: First Boot and BIOS Setup
- Connect your monitor, keyboard, and mouse to your PC.
- Plug in the power cord and turn on the power supply switch.
- Press the power button on your PC case.
- If all goes well, your PC should boot up, and you’ll see the BIOS/UEFI screen. This is the firmware interface for your motherboard.
- Navigate the BIOS/UEFI settings to ensure all your components (CPU, RAM, storage) are recognized.
- You might need to adjust the boot order to boot from your USB drive containing the Windows installation files.
Step 15: Install the Operating System
- With your boot order set to the USB drive, save the BIOS/UEFI settings and exit. Your PC should reboot from the USB drive.
- Follow the on-screen instructions to install Windows. You’ll need your Windows product key.
- Once Windows is installed, install the necessary drivers for your motherboard, graphics card, and other peripherals. You can usually find these drivers on the manufacturers’ websites.
Step 16: Install Games and Enjoy!
Congratulations! You’ve successfully built your gaming PC. Now you can install your favorite games and enjoy the fruits of your labor.
My Personal Tips and Experiences
- Take Your Time: Don’t rush the build process. Double-check connections and refer to your manuals.
- Ground Yourself: Always wear an anti-static wrist strap to prevent damaging components.
- Read the Manuals: Your motherboard and component manuals contain valuable information. Don’t hesitate to consult them.
- Watch Build Videos: There are many excellent video tutorials online that can visually guide you through the process. I often watch a few before starting a new build.
- Don’t Be Afraid to Ask for Help: If you get stuck, there are many online communities and forums where you can ask for assistance.
Building a gaming PC is a fantastic learning experience and a great way to get the exact performance you need. Enjoy the process and the awesome gaming rig you’ve created!